
前言
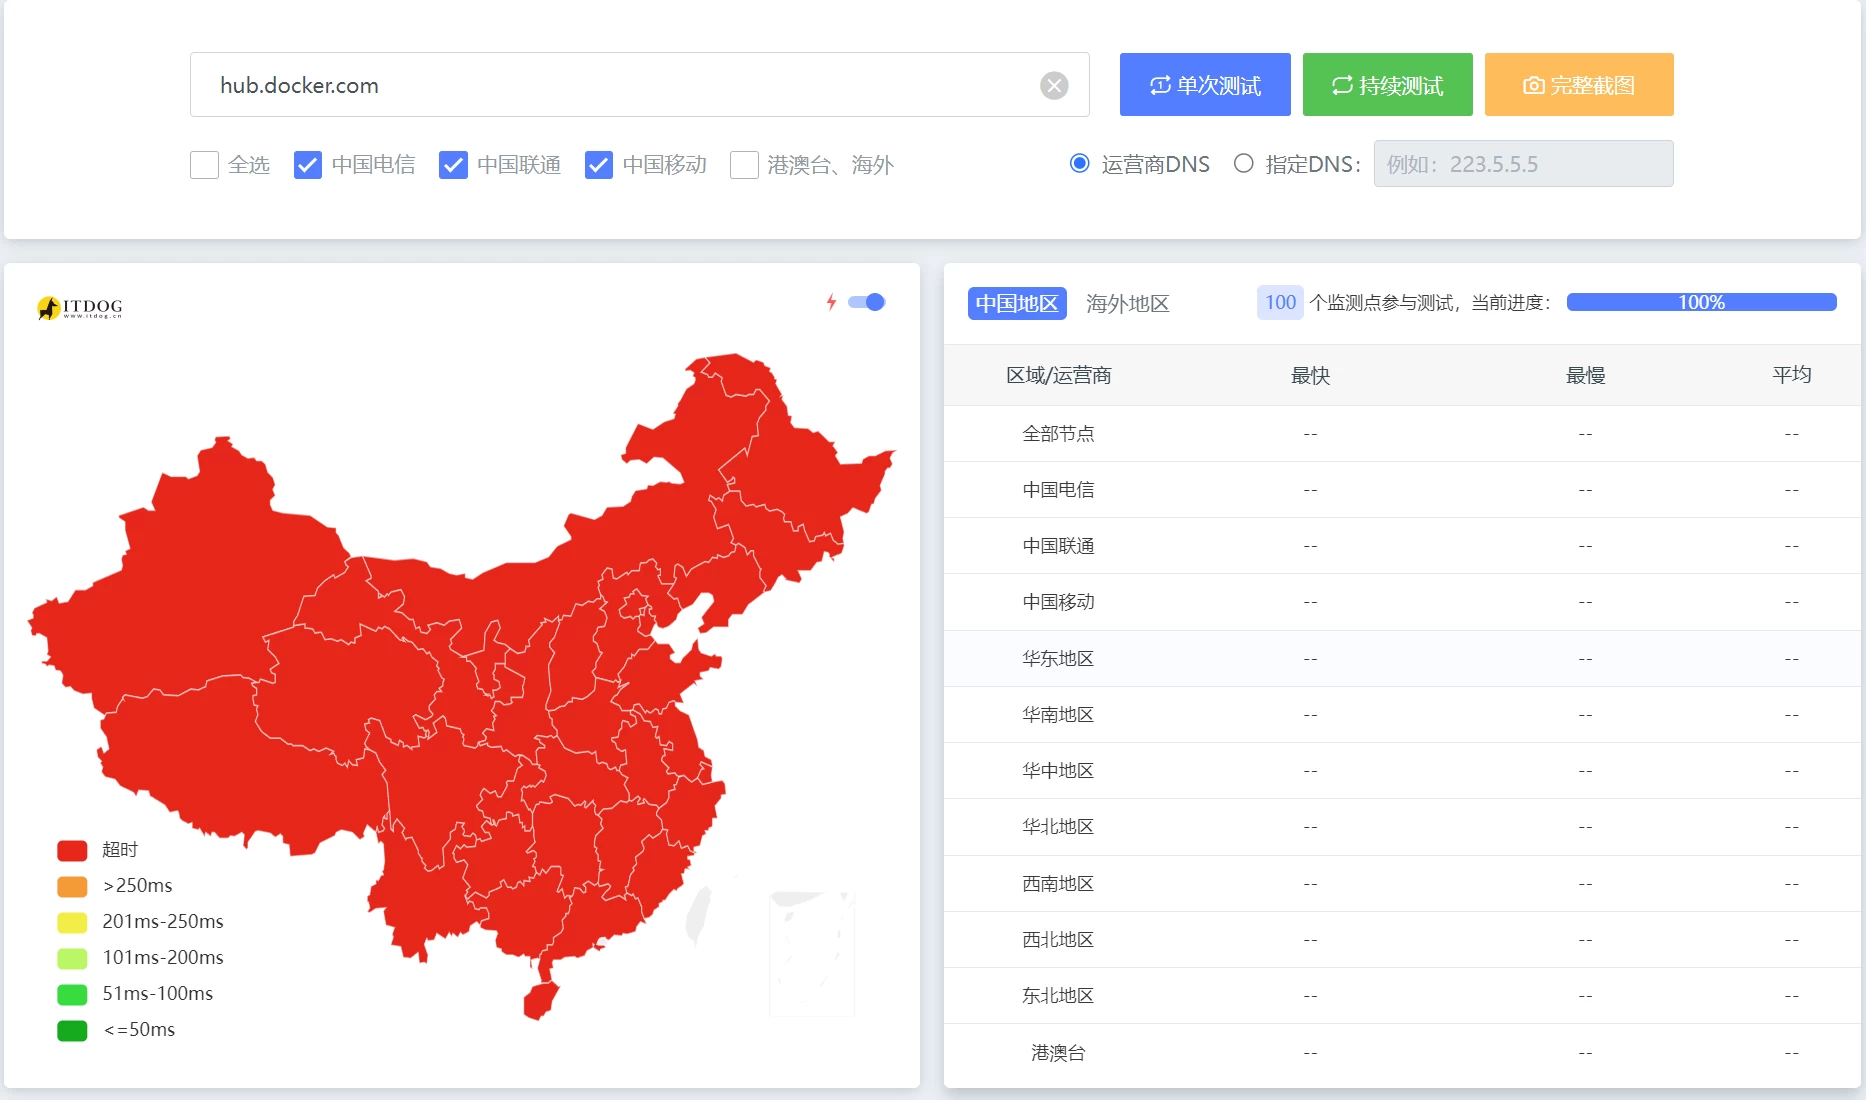
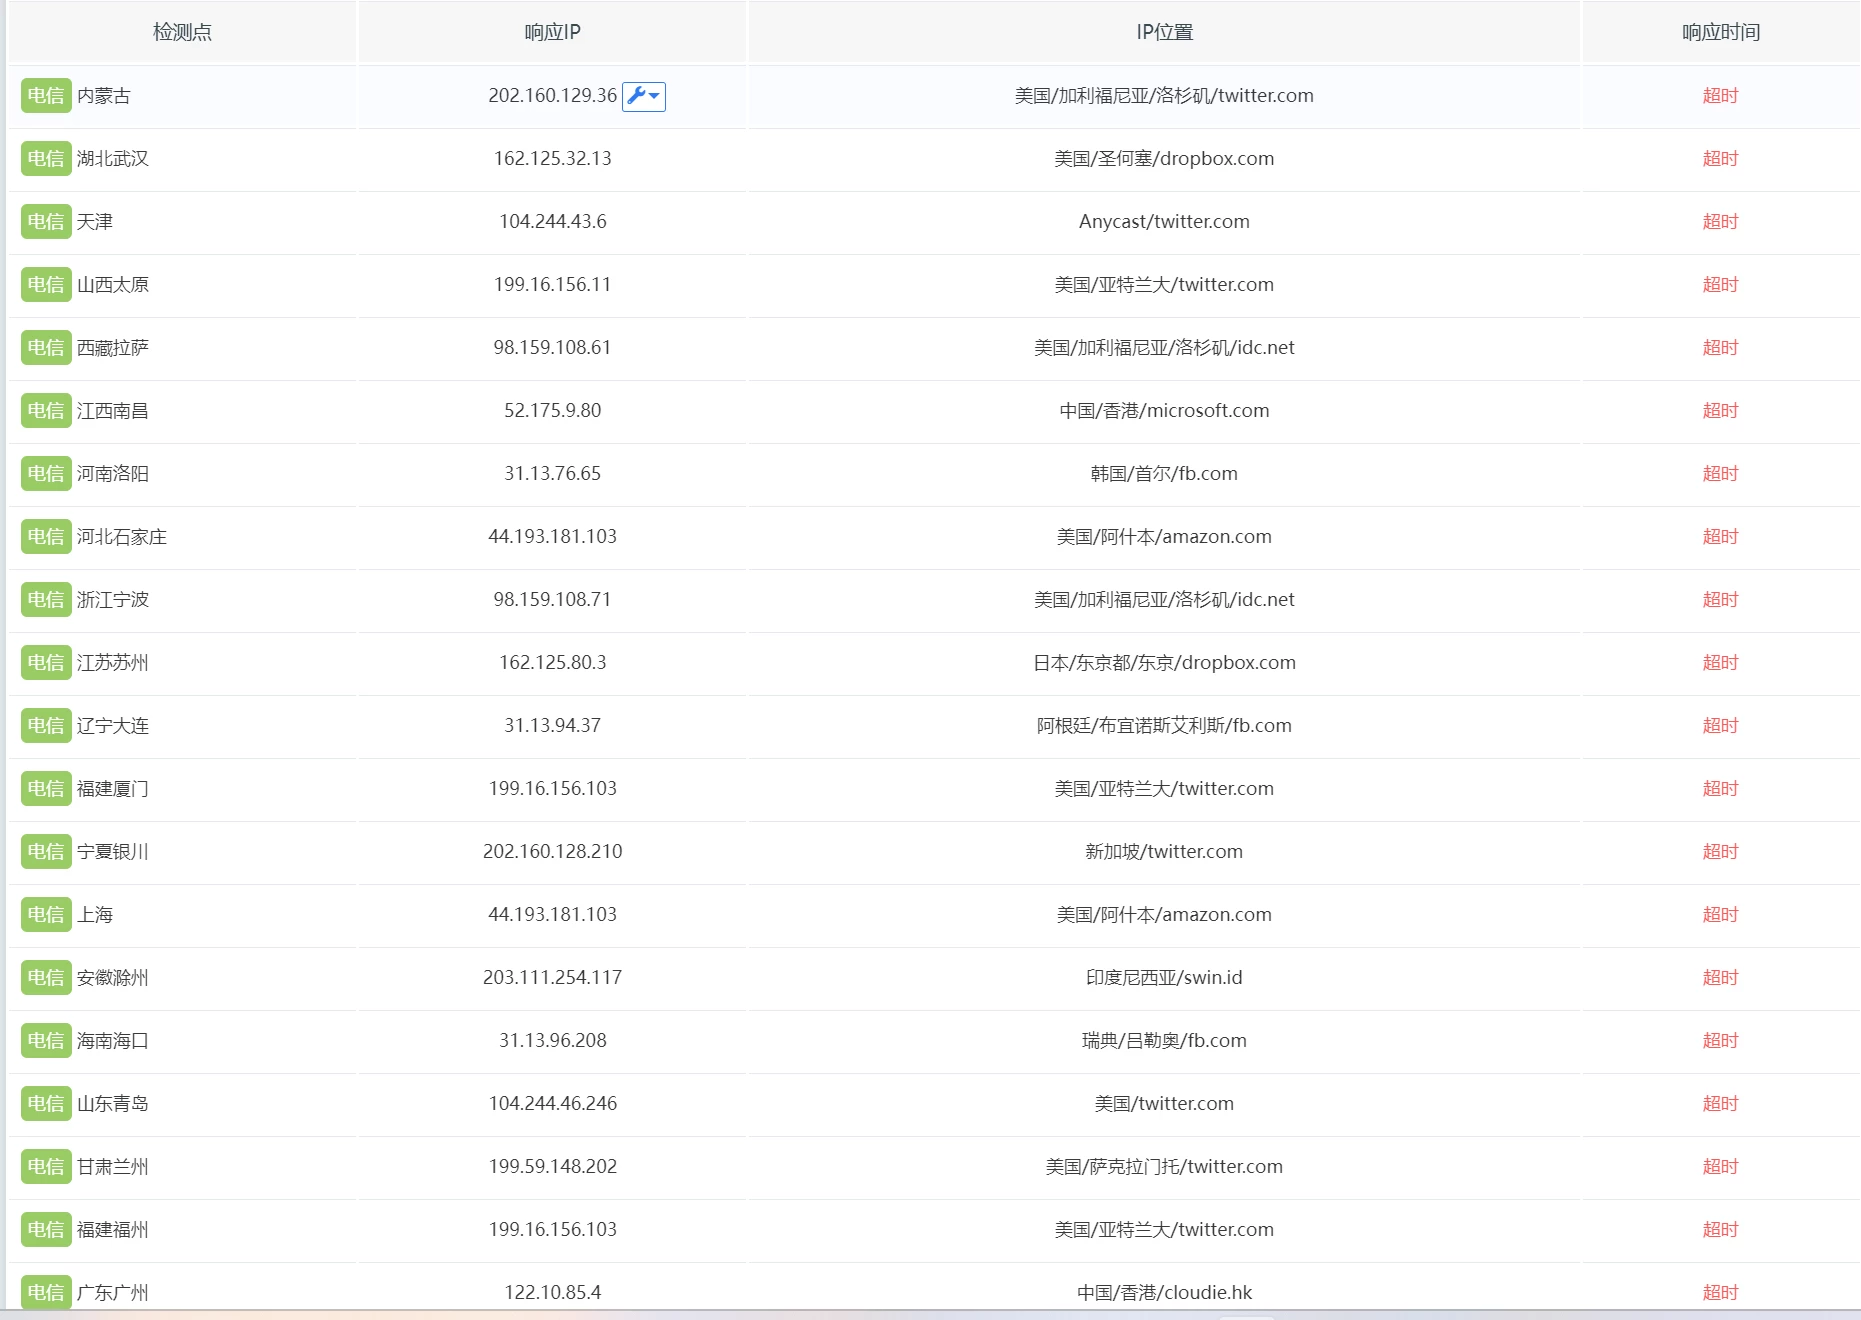
前不久 Docker Hub受到 dns 污染,国内的企业和高校提供的镜像站也继而关闭,目前存活镜像站越来越少,拉取镜像很不方便。
上海交大关闭声明: https://sjtug.org/post/mirror-news/2024-06-06-takedown-dockerhub (网页存档)
南京邮电大学声明:https://mirrors.nju.edu.cn/news/0


当前可用镜像(办法1)
为应对突发情况,我整理了失效的和关闭的镜像站,如果有人看到就不用再去试了。目前还有几个存活的镜像站,能用一天是一天,且用且珍惜吧。
如果你有最新可用镜像站,或有镜像站变更、失效,欢迎在评论区留言。
目前已知:
关闭的镜像站:Docker 官方中国镜像、 七牛云镜像站、网易云镜像站、上海交大镜像站、南京大学镜像站、中科院软件所镜像站、Docker镜像代理。
关闭访问的镜像站:腾讯云镜像站(腾讯云服务器可用?)、阿里云镜像、Azure中国镜像站、科大镜像站。
可用镜像站:(网络收集,不能保证访问速度,发文时测速是可用的):
| 镜像名字 | 镜像地址 | 镜像状态 | 加速功能 |
| 毫秒镜像 | https://docker.1ms.run | 正常 | Docker Hub |
| DaoCloud 镜像站 | https://docker.m.daocloud.io | 限流使用,详情 | Docker Hub、GCR、K8S、GHCR、Quay、NVCR |
| DockerProxy 官方 | https://dockerpull.org | 正常 | Docker Hub |
| 轩辕镜像 | https://docker.xuanyuan.me/ | 正常 | Docker Hub |
| 1panel 提供 | https://docker.1panel.dev | 8.23可用性降低 | Docker Hub |
| 1panel 提供 | https://docker.1panel.live | 仅限国内访问 | Docker Hub |
| 耗子面板提供 | https://hub.rat.dev | 开启 UA 白名单 | Docker Hub |
| 爱铭网络提供 | https://docker.amingg.com https://hub.amingg.com | 正常 | Docker Hub |
| 棉花云提供 | https://docker.nat.tf/ | 正常 | Docker Hub |
| 渡渡鸟镜像站 | https://docker.aityp.com | 正常 | Docker Hub |
| Docker.gs | https://docker.gs | 正常 | Docker Hub |
| dockerhub镜像(v2ex网友提供) | https://dockerhub.icu | 正常 | Docker Hub、ghcr |
| 本站提供 | https://docker.lalkk.com/ | 正常 | Docker Hub、ghcr |
镜像的使用方法比较简单方便,可以在 /etc/docker/daemon.json 里设置
sudo tee /etc/docker/daemon.json <<EOF

{
    "registry-mirrors": [
        "https://docker.m.daocloud.io",
        "https://huecker.io",
        "https://dockerhub.timeweb.cloud",
        "https://dockerproxy.1panel.live"
    ]
}
EOF

sudo systemctl daemon-reload
sudo systemctl restart docker
也可以在拉取镜像的时候使用镜像仓库,例如拉取mysql:
docker pull docker.m.daocloud.io/mysql本地镜像导出导入(办法2)
除了直接从docker仓库拉取镜像到服务器外,还可以从本地上传Docker的镜像到服务器进行部署。
1.在可以访问Docker Hub的本地机器上拉取所需的 Docker 镜像(本地机器需要安装Docker)。比如拉取nginx :
docker pull nginx2.保存 Docker 镜像到本地文件。使用 docker save 命令将 Docker 镜像保存为一个 .tar 文件:
docker save -o nginx.tar nginx保存完毕后上传压缩包到服务器,比如上传到 /dockerfile 目录。
3.加载 Docker 镜像。在服务器上使用 docker load 命令加载 Docker 镜像:
docker load -i /dockerfile/nginx.tar4.运行容器
docker run -d -p 80:80 nginx自建镜像
推荐搭建 registry-mirror
仓库地址:https://github.com/bboysoulcn/registry-mirror
搭建方式:项目依赖 Docker 环境,搭建前需要在境外服务器预装好Docker。
拉取项目文件
git clone https://github.com/bboysoulcn/registry-mirror进入相应的项目目录执行 docker-compose up -d 启动容器就行了。
docker-compose up -d如果要绑定域名可使用 Nginx 反向代理
server {
    listen 443 ssl http2;
    server_name docker.your-domain.com;

    ssl_certificate cert/your-cert.pem;
    ssl_certificate_key cert/your-key.key;
    ssl_session_timeout 5m;

    location / {
        proxy_pass http://127.0.0.1:5000;
        client_max_body_size 1000m;
    }
}
使用反向代理方式
Docker Hub 的官方镜像仓库:https://registry-1.docker.io
Nginx反代
使用Nginx进行反向代理,编辑 nginx.conf:
server {
             listen 443 ssl;
             server_name 域名;

             ssl_certificate 证书地址;
             ssl_certificate_key 密钥地址;

             ssl_session_timeout 24h;
             ssl_ciphers 'ECDHE-ECDSA-AES256-GCM-SHA384:ECDHE-RSA-AES256-GCM-SHA384:ECDHE-ECDSA-CHACHA20-POLY1305:ECDHE-RSA-CHACHA20-POLY1305:ECDHE-ECDSA-AES128-GCM-SHA256:ECDHE-RSA-AES128-GCM-SHA256';
             ssl_protocols TLSv1 TLSv1.1 TLSv1.2 TLSv1.3;

             location / {
                     proxy_pass https://registry-1.docker.io;  # Docker Hub 的官方镜像仓库
                     proxy_set_header Host registry-1.docker.io;
                     proxy_set_header X-Real-IP $remote_addr;
                     proxy_set_header X-Forwarded-For $proxy_add_x_forwarded_for;
                     proxy_set_header X-Forwarded-Proto $scheme;

                     proxy_buffering off;

                     proxy_set_header Authorization $http_authorization;
                     proxy_pass_header  Authorization;

                     # 对 upstream 状态码检查,实现 error_page 错误重定向
                     proxy_intercept_errors on;
                     # error_page 指令默认只检查了第一次后端返回的状态码,开启后可以跟随多次重定向。
                     recursive_error_pages on;
                     # 根据状态码执行对应操作,以下为301、302、307状态码都会触发
                     error_page 301 302 307 = @handle_redirect;

             }
             location @handle_redirect {
                     resolver 1.1.1.1;
                     set $saved_redirect_location '$upstream_http_location';
                     proxy_pass $saved_redirect_location;
             }
     }
Cloudflare反代
登录Cloudflare: https://dash.cloudflare.com/
控制台面板左侧 -> Workers 和 Pages -> 创建应用程序 -> 创建 Worker -> 点击保存 -> 点击完成 -> 编辑代码
worker.js 内容
import HTML from './docker.html';
export default {
  async fetch(request) {
    const url = new URL(request.url);
    const path = url.pathname;
    const originalHost = request.headers.get("host");
    const registryHost = "registry-1.docker.io";
    if (path.startsWith("/v2/")) {
      const headers = new Headers(request.headers);
      headers.set("host", registryHost);
      const registryUrl = `https://${registryHost}${path}`;
      const registryRequest = new Request(registryUrl, {
        method: request.method,
        headers: headers,
        body: request.body,
        redirect: "follow",
      });
      const registryResponse = await fetch(registryRequest);
      console.log(registryResponse.status);
      const responseHeaders = new Headers(registryResponse.headers);
      responseHeaders.set("access-control-allow-origin", originalHost);
      responseHeaders.set("access-control-allow-headers", "Authorization");
      return new Response(registryResponse.body, {
        status: registryResponse.status,
        statusText: registryResponse.statusText,
        headers: responseHeaders,
      });
    } else {
      return new Response(HTML.replace(/{{host}}/g, originalHost), {
        status: 200,
        headers: {
          "content-type": "text/html"
        }
      });
    }
  }
}
新建 docker.html 文件,粘贴下面代码
<!DOCTYPE html>
<html lang="zh-CN">
<head>
<meta charset="utf-8">
<meta name="viewport" content="width=device-width, initial-scale=1">
<title>镜像使用说明</title>
<style>
body {
font-family: 'Roboto', sans-serif;
margin: 0;
padding: 0;
background-color: #f4f4f4;
}
.header {
background: linear-gradient(135deg, #667eea, #764ba2);
color: #fff;
padding: 20px 0;
text-align: center;
box-shadow: 0 2px 4px rgba(0, 0, 0, 0.1);
}
.container {
max-width: 800px;
margin: 40px auto;
padding: 20px;
background-color: #fff;
box-shadow: 0 4px 8px rgba(0, 0, 0, 0.1);
border-radius: 10px;
}
.content {
margin-bottom: 20px;
}
.footer {
text-align: center;
padding: 20px 0;
background-color: #333;
color: #fff;
}
pre {
background-color: #272822;
color: #f8f8f2;
padding: 15px;
border-radius: 5px;
overflow-x: auto;
}
code {
font-family: 'Source Code Pro', monospace;
}
a {
color: #4CAF50;
text-decoration: none;
}
a:hover {
text-decoration: underline;
}
@media (max-width: 600px) {
.container {
margin: 20px;
padding: 15px;
}
.header {
padding: 15px 0;
}
}
</style>
<link href="https://googlefonts.admincdn.com/css2?family=Roboto:wght@400;700&family=Source+Code+Pro:wght@400;700&display=swap" rel="stylesheet">
</head>
<body>
<div class="header">
<h1>镜像使用说明</h1>
</div>
<div class="container">
<div class="content">
<p>为了加速镜像拉取,你可以使用以下命令设置 registry mirror:</p>
<pre><code>sudo tee /etc/docker/daemon.json <<EOF
{
"registry-mirrors": ["https://{{host}}"]
}
EOF</code></pre>
<p>为了避免 Worker 用量耗尽,你可以手动 pull 镜像然后 re-tag 之后 push 至本地镜像仓库:</p>
<pre><code>docker pull {{host}}/library/alpine:latest # 拉取 library 镜像
docker pull {{host}}/coredns/coredns:latest # 拉取 coredns 镜像</code></pre>
</div>
</div>
<div class="footer">
<p>Powered by Cloudflare Workers</p>
</div>
</body>
</html>
最后部署项目,因为works的域名又被污染,最好绑定自己的域名访问。
附自建代理镜像的一些解决方案
自建Docker镜像加速服务,基于官方 registry 一键部署Docker、K8s、Quay、Ghcr、Mcr、elastic、nvcr等镜像加速\管理服务
项目地址:https://github.com/dqzboy/Docker-Proxy
使用境外服务器搭建 Docker Hub 加速:
项目地址:https://github.com/wzshiming/crproxy/tree/master/examples/default
自建镜像,支持 DockerHub 、PyPI 、PyTorch 、NPM 等镜像缓存服务:
https://github.com/NoCLin/LightMirrors
使用cloudflare 进行代理:
项目地址:https://github.com/ImSingee/hammal
使用 Nexus 3搭建镜像:
https://hub.docker.com/r/sonatype/nexus3
使用 Github Action 将 DockerHub 镜像转存到阿里云私有仓库:
项目地址:https://github.com/tech-shrimp/docker_image_pusher
注:滥用 action 可能会有封号的风险。
方便地设置和启动各种镜像仓库代理:
https://github.com/bboysoulcn/registry-mirror
0